

This past January, my county started the “No Plastic Bag” law and are charging customers (minumum) $0.10 a bag. I know this is not new to a lot of places, but it is very new here! I am still getting used to always remembering my bags.
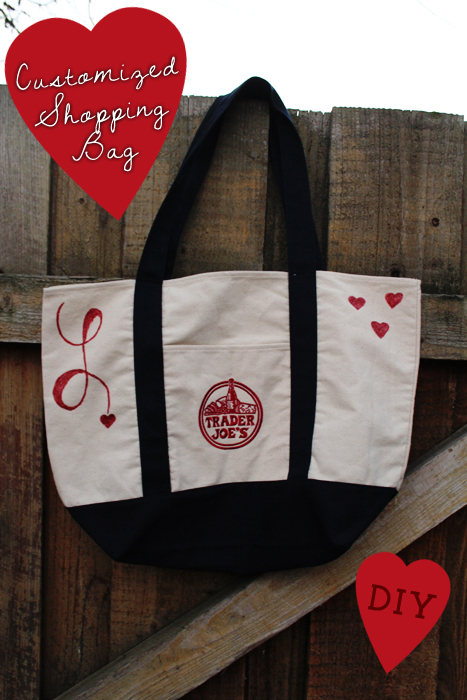
I bought a Trader Joe’s canvas shopping bag the other day ago, and I kept thinking: “I really hate how everyone’s bags look the same!”
I didn’t want my bag to get mixed up with anyone else’s, so my idea: CUSTOMIZED SHOPPING BAG! So, here you are: a nice and easy DIY to customize your boring reusable shopping bag!

SUPPLIES:
- Cloth Shopping Bag
- Fabric Paint (or Craft Paint that works on fabric)
- Pencil
- Small Paint Brush (for detail work)
- Small Scrap Paper (to use as a paint palette)
STEPS:
1. First things first, you want to figure out the type of design you want to put on your bag. It may help to print out inspiration. I decided to free hand draw a cursive “L” with some girly hearts.
2. Once you have your design in mind, lay your Cloth Shopping Bag flat, right side up on your work surface (table).
3. Using your pencil, lightly sketch out your design on your Cloth Shopping Bag.

4. With your design sketched on your Shopping Bag, you can now move onto paint! Squeeze some fabric paint on your small scrap paper.

5. Begin outlining your design using your small paint brush and fabric paint.

6. Once everything is outlined, fill in the larger areas of your design.

(Optional) 7. If your first coat of paint is not quite the color you want it to be, you may want to do more coats of paint. To do this, let the first coat of paint dry for about 1 hour. Then, repeat STEP 5.
8. Let your bag dry overnight.
9. Your Customized Shopping Bag is now complete! Happy Shopping!
