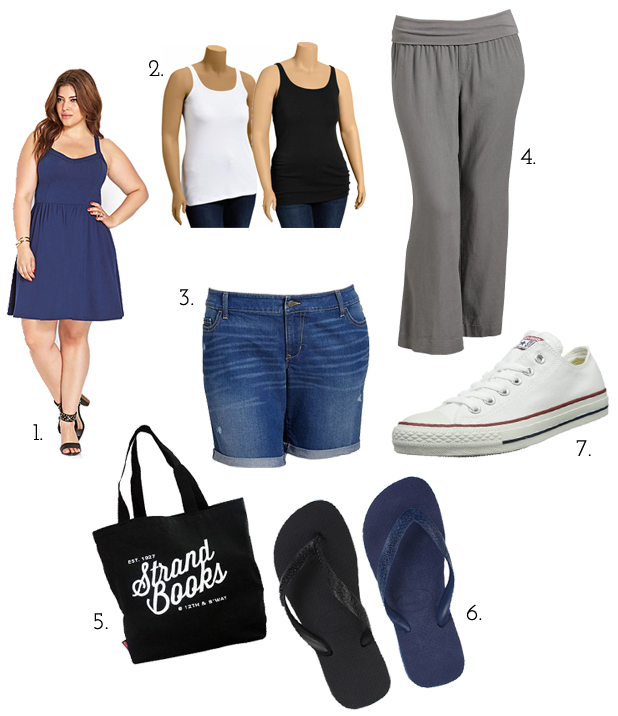
The summer calls for traveling, “fun in the sun,” and keeping cool. Through the years I have developed a repertoire of items I use during the hot months. I re-buy and wear these items over and over. Here are my 7 Summer Basics for Plus Size. All items are great for pairing with fashion pieces, accessories, etc.
-
Basic Cotton Summer Dress: During the hot summer months, a light cotton dress in a solid color is the best go-to. Cotton is breathable versus man-made fibers such as Polyester. Find a silhouette that best suits your shape and you can change this basic up all summer long with accessories and other pieces. (Pictured Dress: Forever 21+)
-
Solid Cotton Tank Tops: I wear these year round by themselves or layered under other items. I always have at least a black and grey colored one. When I find a style I like, I buy them in multiple colors. (Pictured Tanks: Old Navy Plus Size)
-
Stretch Denim Shorts: I have had multiple pairs of cuffed denim shorts through the years. My current pair is from Forever 21+ that I bought about 2 years ago — they’re still going strong! Another go-to item for everyday hot summer months. (Pictured Shorts: Old Navy Plus Size)
-
Neutral Linen Pants: Yes, linen pants do wrinkle easily, but sometimes that’s what makes them great! I have owned so many pairs of linen pants over the years. They are a great option when the occasion doesn’t allow for shorts. (Pictured Pants: Old Navy Plus)
-
Tote Bag: I LOVE TOTE BAGS. This same bag has been my main purse since my trip to New York last November. A tote is a great basic because it acts as a purse, is light weight, and can hold so much — they’re great for traveling and adventures during the summer! (Pictured Tote: Strand Books)
-
Havaianas Flip Flips: I wear flip flops almost every day once the weather gets warm. They are comfortable and easy to throw on. Through the years I have tried both cheap $3 flip flops and more expensive Havaianas. Let me say — paying the extra money for a good brand means the world of difference! They last longer, don’t get as nasty smelly, and are much more comfortable. So, splurge. Buy a few basic colors and wear them with everything! (Pictured Sandals: Havaianas)
-
Converse All Stars: These are another one of those basic shoes that you can keep forever. I have one pair I’ve worn since junior year of high school (and I had my ten year reunion last year, to give you an idea of how old they are). A great lightweight, basic sneaker that you can wear when the flip flops aren’t quite right. (Pictured Sneakers: Converse)

